


How to Add Search Box to your Blog

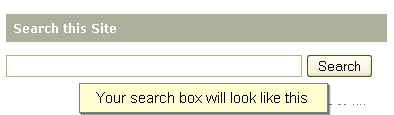
Many templates come with a search box already added but if your template does not have this feature you may want to add it. You can also add a Google Search box but personally, I don't like the way it returns the results. It always opens the results in a new window. I believe readers would rather stay on your site and see the results in the same window. Ultimately, though, it is up to you. This is instruction for adding a simple search box to your blog.
This simple search box can be added to either Blogger or WordPress in just a few easy steps.
Blogger instructions:
1. Click the Layout tab from your blog Dashboard.
2. Click Page Elements.
3. Click Add a Gadget above the section you want to put your search box in.
4. Click the plus sign next to HTML/Javascript.
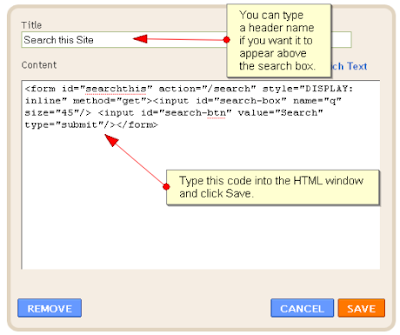
5. Type Search this blog (or whatever you want) in the Title box or leave it blank.
6. Copy and paste this HTML code in the text area. Do not modify anything.
7. Click Save.
8. Click Preview.
9. You may have to drag the search gadget into a new area until you get it positioned where you want it.
10. To test it click View Blog.
WordPress instructions:
Note: this will not work on WordPress.com You must have a self hosted WordPress blog to use it.
1. Click the Appearance link from the sidebar.
2. Click Widgets.
3. Drag a text widget from the left to the sidebar on the right.
4. Click the down arrow on the text widget to open it.
5. Copy and page this HTML code in the text area. Do not modify anything.
7. Click Save.
8. Preview your blog.
9. You may have to drag the search gadget into a new area until you get it positioned where you want it.
10. To test it click View Blog.
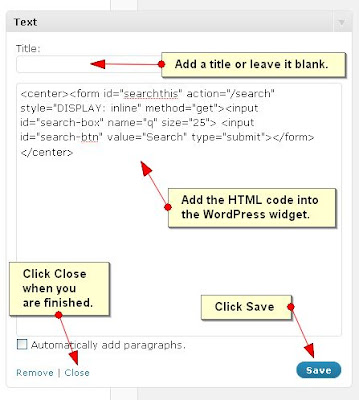
Now if you want to make your search box wider you can modify the line that reads size="25" changing the number 25 until you get your search box as wide as you like.
This simple search box can be added to either Blogger or WordPress in just a few easy steps.
Blogger instructions:
1. Click the Layout tab from your blog Dashboard.
2. Click Page Elements.
3. Click Add a Gadget above the section you want to put your search box in.
4. Click the plus sign next to HTML/Javascript.
5. Type Search this blog (or whatever you want) in the Title box or leave it blank.
6. Copy and paste this HTML code in the text area. Do not modify anything.
7. Click Save.
8. Click Preview.
9. You may have to drag the search gadget into a new area until you get it positioned where you want it.
10. To test it click View Blog.
WordPress instructions:
Note: this will not work on WordPress.com You must have a self hosted WordPress blog to use it.
1. Click the Appearance link from the sidebar.
2. Click Widgets.
3. Drag a text widget from the left to the sidebar on the right.
4. Click the down arrow on the text widget to open it.
5. Copy and page this HTML code in the text area. Do not modify anything.
7. Click Save.
8. Preview your blog.
9. You may have to drag the search gadget into a new area until you get it positioned where you want it.
10. To test it click View Blog.
Now if you want to make your search box wider you can modify the line that reads size="25" changing the number 25 until you get your search box as wide as you like.
Monday, January 25, 2010 |
0
comments |
Read more...
SEO Friendly Post Titles and Permalinks
 The title of your post is the 3rd most important thing you can do to make your blog SEO friendly. The first is the name of your blog and the second is the URL of your blog.
You need to make sure your blog is optimized so search engines can find it. When you do anything that helps search engines find your blog like I am going to teach below, you are using SEO techniques.
When you create a title for your post and then publish that post your blogging platform gives that post a PERMALINK. A Permalink is the permanent link to that post you just wrote.
Creating SEO Friendly Post Titles in WordPress
WordPress will allow you to write super long post titles and include lots of keywords in them and then it will turn your post title into a nice long URL that includes all of those keywords. This is one of the best built-in SEO feature WordPress offers. WordPress will also allow you to change the Permalink of a post if you decide you made a mistake or want it to be something different later on. Blogger does not allow you to change your URL. This is the only real thing that bugs me about Blogger but I have a work around (see below).
Example: what if I wrote a post with this title
How to Save Money By Clipping Grocery Store Coupons
WordPress would turn it into something like this:
http://www.nameofyourblog.com/....how-to-save-money-by-clipping-grocery-store-coupons
Do you see what WordPress did?
It kept your entire post title in that post's URL even though it was super long. It put hyphens (dashes) in between each word. This is very important because now not only does your title have keywords in it, the title matches the URL.
How to Create SEO Friendly Post Titles in Blogger
While WordPress allows you to edit your post's permalink, Blogger does not offer this feature. For this reason some thought should go into what you want for your permalink for EACH AND EVERY POST YOU WRITE because you can't change them later. The most you can do is delete the post and start over. And, once people read it you don't want to do that. Take a few extra minutes and think about how to match up your title with what Blogger is going to turn it into and it will go a long way in making your blog SEO friendly.
Blogger cuts off the title you write after 35 to 40 characters (a character is a single letter, number or space). That means that if you write a super long post title the URL will be cut off after around 40 characters. In that case just make sure the most important keywords are near the beginning.
Post Example: using the same example above
How to Save Money By Clipping Grocery Store Coupons
Blogger would turn it into:
http://www.nameofyourblog.com/...how-to-save-money-by-clipping-grocery.html
Do you see what Blogger did?
One of the most important keywords, coupons, was cut off. Those dashes that were inserted are considered part of the 35 to 40 characters because they represent the spaces you put in between the words in the title.
A better choice for title would be: How to Save Money By Clipping Coupons
Blogger Post Title Trick:
Write and rewrite
Here's what I would do in that case. I like my long post titles so I would write the title as How to Save Money By Clipping Coupons and then I would publish my post. Then I would click Edit Post and go back and change the title to How to Save Money By Clipping Grocery Store Coupons.
You see, once you publish the post the Permalink is set and now you can go back and change your title to a super long one and it won't effect the permalink.
A Winning Combination
Now your next step is to make sure you are using the same keywords in the post you write. Include the words you have put in your title like "save money", "grocery store coupons", etc.
When your post title matches the post URL (or permalink) and what you write in the post matches you have a WINNER! Now that post can easily be found on search engines because it has the winning combination.
How to I find and copy the Permalink for a particular post?
If you wanted to send someone to read that post you just wrote you wouldn't send them to your homepage. You would send them directly to the post by giving them the Permalink, or permanent link to the post.
There are two ways to find the permalink to a post.
- Go to the public view of blog and find the post. Hover your mouse over the post title and then look at the bottom of your screen in the taskbar and you will see the permalink to the post. If you want to copy the permalink to send to someone then just right-click on the post title, and then left-click Copy.
- On the backend of your blog where you write your posts click Edit Post. Find the post you are searching for but do not open it. Hover your mouse over the View link and then look at the bottom of your screen in the taskbar and you will see the permalink to the post. If you want to copy the permalink to send to someone then just right-click on the View link, and then left-click Copy.
- SEO: Search Engine Optimization (things you do to your blog and blog posts to help your blog get found through search engines)
- Permalink: the permanent link to that post you just wrote
- Taskbar: the gray bar at the bottom of your browser that indicates when something is going on such as a page is loading, the URL of a page when hovered over, or if a page is Done loading
- Character: a single letter, number or space
Monday, January 11, 2010 |
10
comments |
Read more...
Blogger Question: Changing Templates and Saving Your Contents
 A read asks, if I change a Blogger template will it delete all of the contents?
Yes and No.
If you mean will Blogger delete the posts you have written then the answer is No. Your posts are safe.
However, it is always a good idea to backup both your existing template and your posts in case something goes wrong. Read How to Install a Template to find out step-by-step instructions for backing up your existing template.
Step-by-step instructions for backing up your posts:
- From your Blogger Dashboard click Settings.
- Click Basic.
- Click Export Blog.
- Click Download Blog.

- A window will pop up. Click Save File.
- Click OK.
- Locate where you want to save this file on your computer.
- Click Save.
Backup your Existing Template and Gadget Contents:
You will also want to back up your existing template in case something goes wrong. That way you can revert back to the original template to get things back the way they were if needed.
However, whatever you have inside of the gadgets/widgets may be deleted if you change your template dramatically.
You will want to back up the information you have stored in those gadgets before you change templates.
Tuesday, December 29, 2009 |
1 comments |
Read more...
Make Money with Amazon Associates for Blogger Blogs
Blogger (owned by Google) is partnering with Amazon Associates to help you monetize your Blogger blog. If you already promote Amazon products this will make it much easier. You won't have to go to Amazon.com and find the code for the products you want to promote. You can use the new Amazon Associates Blogger widget from the comfort of your new post page.
With just two clicks, Google Blogger users can now add revenue-generating Amazon product links to their blogs.
To get started log into your Blogger.com account, click Monetize, and then the Amazon Associates tab on the blog you want to setup.

Either choose to setup a new Amazon Associate account or use an existing one. You can setup a new Amazon Associates account right from that Monetize section. If you use an existing account you will need to know your ID. If you don't know what that is you can go to Amazon.com, log into your account and you will find it on the top left-hand side of your Associates homepage.
You will also need to check to Product Finder Blogger Editor to be enabled and then Save what you have setup. The Amazon Associates widget will now be enabled and it will appear when you go to create a new post or edit an existing post. It will show up on the right-hand side of the screen.

To use it just bring up an existing post in Edit mode or create a New Post and then type in a keyword in the Product Finder to find products that relate to what you are writing about today. Then you can insert a text link, image, or text and image to that product with a click of a button which will include your Amazon Associates ID, enabling you to earn up to 15% in referral fees from Amazon.
You will also be able to show dynamic content in their blog's sidebar using a new set of integrated Sidebar gadgets, such as gadgets for MP3 clips from the Amazon DRM-free music store, an Amazon Deals gadget, and an Amazon Search box.
With just two clicks, Google Blogger users can now add revenue-generating Amazon product links to their blogs.
To get started log into your Blogger.com account, click Monetize, and then the Amazon Associates tab on the blog you want to setup.

Either choose to setup a new Amazon Associate account or use an existing one. You can setup a new Amazon Associates account right from that Monetize section. If you use an existing account you will need to know your ID. If you don't know what that is you can go to Amazon.com, log into your account and you will find it on the top left-hand side of your Associates homepage.
You will also need to check to Product Finder Blogger Editor to be enabled and then Save what you have setup. The Amazon Associates widget will now be enabled and it will appear when you go to create a new post or edit an existing post. It will show up on the right-hand side of the screen.

To use it just bring up an existing post in Edit mode or create a New Post and then type in a keyword in the Product Finder to find products that relate to what you are writing about today. Then you can insert a text link, image, or text and image to that product with a click of a button which will include your Amazon Associates ID, enabling you to earn up to 15% in referral fees from Amazon.
You will also be able to show dynamic content in their blog's sidebar using a new set of integrated Sidebar gadgets, such as gadgets for MP3 clips from the Amazon DRM-free music store, an Amazon Deals gadget, and an Amazon Search box.
Wednesday, December 16, 2009 |
5
comments |
Read more...
Free Social Media Buttons For Your Blog
Here is a collection of free social media buttons for Facebook, Twitter, and more that you are free to save and use on your own blog or website. Nowadays you need to promote every social media account you are using and putting one of these free buttons on your site is a great way to do it. I even have some generic buttons you could use on your blog for email and RSS feeds.
How to save a button to use on your blog:
Picture Gadget/Widget:


























Do you have other social media buttons you would like me to add to this post? Do you have other free image hosting services you know about that I could add to this post?
How to save a button to use on your blog:
- Hover over the button with your mouse and right-click on it.
- A menu will appear and then you can left-click Save As.
- Save the image to your hard drive (somewhere you will find it again).
Picture Gadget/Widget:
- An easy way to upload it to your blog is to use the Picture gadget and just link the picture to your Facebook, Twitter or other social networking account.
- If you would like to create a special layout on your blog you will need to host the picture somewhere. You can create a free account at Flickr.com or Photobucket.com and upload the button image there.
- To add the button to your blog add an HTML/JavaScript gadget and then copy this HTML layout and change the http://www.url.com to the exact URL where your buttom image is stored.
<center><a href="http://www.YOURSOCIALMEDIAACCOUNTTURLHERE.com" target="_blank"><img src="http://www.THEURLOFTHEIMAGEHERE.com" border="0" /></a></center>To find the exact URL where your button image is stored do this:
- Go to your account at Flickr.com or Photobucket.com and find the image
- Right-click on the image and then left-click Copy Image Location.
Do you have other social media buttons you would like me to add to this post? Do you have other free image hosting services you know about that I could add to this post?
Wednesday, November 18, 2009 |
7
comments |
Read more...


